
Over time, all garbage will start to break down or become damaged, leading to a leak. In most cases, garbage disposals will start leaking from the bottom, from the drain, or from the outer housing. Most issues that cause a leak require disassembling the garbage disposal, so the best way to prevent a repair headache is to keep a close eye on what you put down your garbage disposal and prevent these issues from occurring in the first place.
WHY IS MY GARBAGE DISPOSAL LEAKING?
Caution: One of the major reasons that newer garbage disposals leak is that they are either installed incorrectly or they are damaged because they were dropped.
It might sound strange that so many people drop garbage disposals, but the reality is that they can be heavy. If you are doing work around your sink and need to remove the unit and then put it back in, it is a good idea to plan to put in some kind of lower support that will keep the disposal from falling while you re-install it.
Another problem that happens from time to time is that something large or difficult to grind gets stuck in the disposal and causes damage that results in a leak. The best way to avoid this is to look carefully at the manufacturer’s directions regarding just what you can safely grind with that type of motor or assembly.
One family who had just purchased a new home found this out when they developed a leak after a few months because they were used to using a heavy-duty model at their old house and the new model that came with the house that they bought was not as strong. So they cleared their plates like they normally would and ended up with some damage. If you just make a point of knowing what is okay and what isn’t, you will save time and money.
WHAT NOT TO PUT DOWN YOUR GARBAGE DISPOSAL
One big problem that can occur with garbage disposals can be related to the drainpipe that removes the wastewater from your kitchen. The biggest culprits are usually:
- Fats
- Oil
- Grease
Water then backs up into your sink, making it possible for an aging disposal to start to leak. You might also see leaks from where the drain pipe leads into the disposal. To avoid this, it is a good idea to remove all fats, oils, and grease from your plates and not let them go down the sink. Your disposal will chew most items up, but these types of waste will not be that affected.
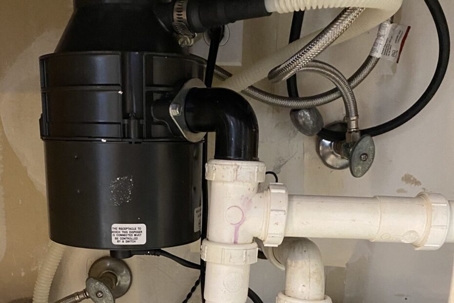
In most cases to check your connection to your drainpipe, you can open the cupboard under the sink and examine where the pipe leads into the disposal. It helps to do this on a regular basis to ensure that you do not have drops of water coming from where the two pieces join.
If you do have your pipes back up and you do not have a leak in your garbage disposal, it is a good idea to fix the problem right away so that you do not risk damaging your disposal unit by having water potentially sit in it for extended periods of time. Hiring a plumber can also help here because they are able to efficiently locate the source of the blockage and repair it right away.
One family was experiencing their kitchen sink stopping up with water, draining slowly over the course of a couple of months, and then eventually it wouldn’t drain at all. Despite using regular drain cleaning products (like Draino, which Jennings Plumbing does not recommend due to the damage it can cause to pipes over time), the situation did not improve. They gave us a call and Jennings Plumbing Services expert came out with a drain snake and camera, then we were able to quickly pinpoint the problem and had their pipe cleaned out and operating normally shortly afterward.
HOW TO FIND AND PREVENT CRACKS
As garbage disposals age, they are subject to the same type of wear and tear as other appliances. Inexpensive models may end up having blades and parts that will wear out more rapidly, and the housing for the unit can become cracked if it is exposed to abuse or stress.
- To avoid cracks, one suggestion is to keep the space under your sink near the disposal free from any garbage can or recyclable container that isn’t plastic. Even if the container is plastic, it helps if you do not fill it or wedge it in tightly next to the disposal housing.
- Checking for cracks normally just requires using a flashlight and a cleaning rag. You can wipe the housing with the rag and feel for cracks as you visually inspect it.
- Garbage disposals are a very well-used appliance in most households. Following the usage guidelines for each manufacturer, keeping them free from fat, oil, and grease, and making certain that they are not failing due to cracks can extend their life and make your life better.
Fixing a Garbage Disposal Leaking From the Top
Discovering a leak at the top of your garbage disposal doesn’t necessarily mean the whole unit is faulty. Often, the issue lies with a loose sink flange, which is what connects the disposal to your sink drain. Here’s how you can address this common problem:
- Inspect the Sink Flange:
- Tighten the Mounting Bolts: Begin by checking the mounting bolts on the flange. Use a wrench to tighten these bolts and secure the connection between the disposal and the sink.
- Check the Plumber’s Putty:
- Apply New Putty: If tightening the bolts doesn’t stop the leak, inspect the plumber’s putty around the flange. If it’s cracked or missing, remove the old putty and add a fresh seal using a new batch.
By carefully examining and adjusting these components, you can often resolve the leak without the need for a complete disposal replacement. This simple fix can save time and money, ensuring your kitchen remains a clean and efficient space.
What to Do When Your Garbage Disposal Leaks from the Bottom
A puddle under your sink is never a welcome sight, especially if it traces back to your garbage disposal. If you’ve confirmed the leak originates from the bottom, there’s a strong chance that internal seals are the culprits, worn out over time with regular use.
Consider Your Options
- Repair vs. Replacement:
- Repair: It’s possible to hire a professional to repair the seals if you’re inclined to patch things up temporarily. However, keep in mind that the effectiveness and longevity of such repairs can be limited.
- Replacement: Opting for a new unit might be the more cost-effective and lasting solution. Modern disposals are reasonably priced and designed to have a lifespan of 5-10 years.
Why Replacement Might Be Best
- Cost Efficiency: New units are generally affordable and save you the hassle of recurring repairs.
- Improved Technology: Newer models often come with enhancements in efficiency and noise reduction.
- Warranty Benefits: A replacement will likely come with a manufacturer’s warranty, providing peace of mind.
Steps to Replace Your Garbage Disposal
- Research and Select a New Unit: Consider leading brands such as InSinkErator, KitchenAid, or Waste King, known for durability and performance.
- Purchase and Install:
- You can often find these units at home improvement stores or online retailers. Choose one that fits your sink and meets your usage needs.
- Installation can be done as a DIY project if you’re handy with tools, or by hiring a professional plumber for seamless setup.
In conclusion, while fixing the internal seals might provide a short-term solution, investing in a new garbage disposal offers more value and reliability. This ensures not only a dry cabinet but also efficient kitchen operations for years to come.
How to Fix a Side Leak in Your Garbage Disposal
Experiencing a leak from the side of your garbage disposal? Here’s a step-by-step guide to troubleshoot and resolve the issue:
- Identify the Leak Source
- Determine if the leak is occurring at the junction where the drain lines connect to the disposal unit. The two main lines involved include the dishwasher’s drain hose and the disposal’s waste pipe.
- Inspect the Drain Connections
- Closely examine the metal clamps securing the drain pipes to the disposal. These clamps ensure a tight fit between the pipes and the disposal.
- Tighten the Metal Clamps
- Use a screwdriver to tighten the screws on the metal clamps. This can help secure any loose connections, potentially stopping the leak.
- Check the Rubber Gasket
- If tightening doesn’t remedy the issue, the rubber gasket that seals the connection may be worn out.
- Replace the Gasket if Necessary
- Purchase a compatible rubber gasket from any hardware store. Follow the instruction manual of your disposal as you replace it, ensuring a snug fit to prevent future leaks.
By following these steps, you should be able to efficiently address and fix a leak from the side of your garbage disposal without needing professional assistance.
Identifying the source of a leak early can save you from costly repairs down the road. Professional leak detection services ensure that hidden leaks are found and fixed before they cause serious damage.
On the other hand, if you do have a problem and would like to get efficient, professional plumbing help, please contact Jennings Plumbing Services, servicing the Little Elm, Frisco, Denton and surrounding areas! Call Today at 972-492-5369!
Is your garbage disposal leaking or malfunctioning? We understand how frustrating this can be, and that’s why our team is ready to provide a seamless, hassle-free experience.
Why Choose Jennings Plumbing Services?
- Expert Repairs: Our skilled technicians specialize in fixing leaking garbage disposals, ensuring your kitchen runs smoothly again.
- Comprehensive Coverage: We proudly serve the North Texas area.
- Customer-Centric Approach: We know plumbing issues are inconvenient, and our goal is to make the repair process as easy as possible for you.
Don’t let a faulty garbage disposal disrupt your day. Reach out to us for professional assistance and enjoy peace of mind knowing your kitchen is in capable hands. Call today at 972-492-5369!